🔌 Power Up Your Adventures with Confidence!
The Progressive International Dynamics PD4645V Inteli-Power 4600 Series Converter/Charger is a state-of-the-art 45 Amp charging solution designed to enhance the lifespan of your RV battery. Featuring a built-in Charge Wizard 4-stage charging system, it intelligently manages battery health while being lightweight and easy to install. Compatible with various models, this converter/charger is a must-have for any RV enthusiast looking to optimize their power management.
| Manufacturer | Progressive Dynamics |
| Brand | Progressive Dynamics |
| Model | 0318.1348 |
| Item Weight | 9 pounds |
| Product Dimensions | 8 x 13.2 x 5.3 inches |
| Country of Origin | China |
| Item model number | PD4645V |
| Batteries | 1 Unknown batteries required. |
| Is Discontinued By Manufacturer | No |
| Manufacturer Part Number | PD4645V |
| Voltage | 12 Volts |
A**N
Great replacement
I’ve got a 1999 chinook rv and this was a direct replacement and works great. Had an rv shop install it and they did it very quickly. Has a blinking light that tells you whether it’s in storage mode or charging mode and adjusts the power output based off the charge of your batteries. Now I can just leave the camper plugged in and I don’t have to worry about anything.
A**K
Perfect Replacement Converter for Magntek 6000 Series! Easy to install!!
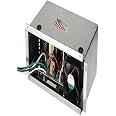
BEFORE ANYTHING!!!<——-> Unplug your camper from its power source, disconnect the positive lead from the battery terminal!Tools needed: Phillips #2, Flat Head screwdriver, needle nose pliers will help pulling individual fuses out, and Allan wrenches. Flash light. Wire cutters and strippers. That’s about it!Let me first start off by saying I do both plumbing and minor electrical for a living. I am not certified in neither. This truly is extremely easy to fix. I called two different local RV repair shops. 1) wanted $550 for the original Magntek 6300 brand and 200hr labor.The 2nd wanted 400 for this exact converter, and 150hr labor plus trip charge. Understandably and respectfully, time is money.I thought screw it, I can handle this. There is literally 5 wires to connect. The three DC 14ga wires (black wire- HOT POS (white wire- NEU NEG) and (green wire- GND). BLACK goes into the breaker switch (black), neutral bar (white) and grounding bar (green). Then there’s 2, AC 10ga wires (black/white) that go into the converter board labeled locations. Reattach the battery wires (in my case they were red (pos) and white (neg) which are clearly labeled on the board and you good to go!Only other thing is you have to transfer all the colored wire along with their fuses from the old converter board over to the new one provided which is super simple. Take a pic with your phone and transfer everything over.I’ve included a nice bright colored real photo of my work with notes in the picture. Just read the instructions that come with the converter and use my pic as guide if needed. It’s truly simple. You may need ONE wing nut for breaker wire. My camper had a jumper. As the instructions will say DO NOT put two wires into the breaker. User a jumper wire. Which is why you see a wing nut.
M**C
EXCELLENT Replacement Converter for Magnatec trash
EXCELLENT replacement part! Considering that this was to replace a 20-year old Magnatec Converter (now out of business), I really didn't expect that much on the 'perfect replacement fit' side of it, but I was wrong! It was nearly a direct bolt-in swap out!This is not to say that it takes a bit of tech savvy and experience in the RV wiring department. If you don't know the working end of a screwdriver, you will probably have trouble with this (too much starter project), but if you are used to RV plumbing, wiring, etc., then this is a real cake-walk!The worst trouble I had, was my old Magnatec fuse block had the battery hot and ground coming in on the bottom, and they had cut the wiring to PRECISE fit, while the new PD converter takes the wiring best onto the fuse block from the top. I didn't have any 10ga wire to extend 6-8 inches, so I ended up robbing the old Magnatec for the needed 10ga wire (and a couple of wire nuts I had) to extend my RV wiring to fit it.As for performance? Well, the old Magnatec was toast. Barely running the AC side, temps felt like a blast furnace coming off it all the time, fan had burned out once, and a new fan just wasn't cooling anything very well. The charger had give up the ghost last year, so in effect, all I really had was an inverter for my RV lights. I spent about 70-minutes on the full install (from power-down, to lights back on), and when it came back up, it was SO MUCH QUIETER! The old Magnatec was so hot, I could barely remove it, but after an hour of watching the new PD unit, it is cool as when it was still in the box. The charge wizard works great (though I do have a new deep cycle in the box, and am on shore power now). I checked all connections with my DMM at start-up, and after an hour - all working GREAT! Fans are SUPER quiet when they kick on (has one in the front, one in the back-left side for 'pull-through'). Box is super-cool, compared to the old Magnatec (which is GREAT, considering this thing resides beneath my RV Fridge!).I am very impressed with design, function, fit and performance! I'll buy another for a stocking 'back-up' (I always keep a spare in the basement), but I don't expect to need it anytime soon. Oh, and the Fuse Panel design they provide is MUCH nicer than the old Magnatec, with the LED (broken circuit) lighting, as well as the larger fuse panel in the same space idea. (I picked up 3 extra fuses, but the panel is the same size - panel is rated for 80-Amps DC max).
K**N
Easy install, direct replacement to original
Need to move a plastic cover over pin to get full volts for lithium batts. Technical service rep was outstanding in assisting me. Unit will only push out 12amps due to the small wires in my 2003 fifth wheel, will rewire soon for faster charging.
D**T
Easy install
Replaced the existing Progressive Dynamics converter so I could install lithium batteries in a 2005 Bigfoot trailer. This replaced a PD4645V converter. Five wires to connect to the power center. Make sure to "switch" the converter to lithium...it's a cap that changes current feeds on the circuit board. 20 minute install.
B**E
Works great
Used for 3 years now and continues to work great. Quieter than the original (2004) and maintains batteries better.Straight forward installation for anyone with a little mechanical ability. Keep the wires labeled so you know where to reconnect.Only downside was for my original breaker panel to go back on, the far left fuse is next to impossible to get to. If I were to do again, I would relocate that fuse to an open spot.
Trustpilot
1 day ago
1 week ago