🚀 Control Your Speed, Command Your Power!
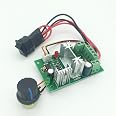
The Bringsmart CCM6N DC PWM Motor Speed Controller is a versatile and compact solution for managing motor speeds between 6V and 30V. With a rated current of 6A and a maximum throughput of 10A, this controller is designed for efficiency and reliability, making it ideal for various applications. Its PWM technology allows for precise speed adjustments, while the built-in short circuit protection ensures safety during operation.


| Manufacturer | Hugwit Company |
| Part Number | A58SW31ZY |
| Item Weight | 3.2 ounces |
| Package Dimensions | 5.12 x 3.27 x 2.01 inches |
| Country of Origin | China |
| Item model number | A58SW31ZY |
| Is Discontinued By Manufacturer | No |
| Size | Speed controller |
| Voltage | 5 Volts, 6 Volts |
| Horsepower | 200 Watts |
| Item Package Quantity | 1 |
| Speed | 30 RPM |
| Batteries Included? | No |
| Batteries Required? | No |
L**.
Doesn't allow full passthrough of voltage
Works ok, but mine does no allow full pass through of 24v power supply. With the dial turned all the way up I am getting about 18.8v being fed to the motor out of the 24v available.
D**S
Motors are excellent, but the controllers don't seem to last.
I've purchased a few of these gear motors and will continue to do so, they are decent. I bought 3 of the motor speed controllers also, and one arrived dead and the other 2 went up in smoke after just a few minutes of use. I didn't do a post mortem on the dead controllers, but it seems from the extreme heat that the 7805 regulator is what burned up, or maybe the control chip itself shorted and then the regulator went next. With the damaged controllers, the motor still runs and can reverse, but only at full speed.The biggest thing I don't like about these controllers is that the control chip itself is not a standard, servicable part. The little 8-dip IC is actually an 8-bit microcontroller with custom programming, so if (when) it dies, you can't just swap in another. Competitors' products use an op-amp or 555 instead, which are easily replaced parts. Maybe there is some benefit to this custom chip, but it seems like overkill and it makes the thing end-user non-repairable. Sure, $13 is not a lot of money to replace the whole board, but a $0.70 IC is still a lot cheaper.
M**M
Defective maybe?
The media could not be loaded. Wired correctly to a 12v drill motor running on a 12v 5 amp battery the wires to the switch that changes the motor direction got so hot they melted and shorted out.
A**R
Low power 12v
Excellent control of 0-5rpm 12 v motor.
T**M
Burnt up
Connected it to a 12v battery and a 12v-24v motor utilizing it to rewind my 3D filament.Smoked it half way through the 1st reel. Had to rewind the rest of the reel by hand. Bummer.
K**R
Too small
Was unable to function for my needs
B**D
Motorize Your Coolaroo Blinds
The media could not be loaded. I’ve seen others who have been interested in motorizing their Coolaroo Roller Shades. Well, I wanted that to so I figured out a ‘fairly’ easy way to do it. I’ve included a picture of the configuration and a video of the movement. The parts are: 12v 80rpm Reversing Motor B07F8S57JT , 8mm Flange Coupling B0822425TT , Motor Mounting Bracket B073NZ81M9 , 12V Momentary Rocker Switch (DPDT) Reverse Polarity B0885W19KL and a 12v ~10amp Power Supply. It will take some playing around to get it all put together, but getting the right pieces was the hardest part. I didn’t play around with trying to get a controller that would have stopping points. Just one more thing to break. So, with this it’s manual stopping points controlled by removing your finger from the switch.I mounted my configuration to a backing board. This allowed me to get it all setup before mounting it. The motor end has to be elevated a little bit to get the roller perpendicular to the backing board. The non-motor end is just the clip-in end that comes with the Coolaroo blind.Take the black plastic end off of the blind that will be attached to the motor end. Attach the flange coupling to that end. I had to make some modifications to the interior of the tube to make room for the small nuts and screw ends I used to attach the coupling. Figure out where the motor needs to be mounted. Once the motor is mounted you can slide on the coupling end on to the motor, lock it in place and snap the other end into the clip-in Coolaroo end.Search for “reverse polarity wiring diagram” in order to see how to wire the switch. For my testing and video I used a weak (1.5 amp) power supply. Using a 5-10amp supply should provide a little more umph. I experimented with a 6’ blind. I don’t believe the motor I used would handle anything bigger. It just wouldn’t have enough torque.Mine will be hung on the outside of the window. I’ll need to get wires into the house and figure out where I want the switch. I’m thinking of just embedding it in the molding on the inside of the window.
Trustpilot
3 weeks ago
1 month ago